Translate

Thứ Ba, 29 tháng 9, 2015

3 bước đơn giản để có 3 năm VPN miễn phí từ F-Secure

3 bước đơn giản để có 3 năm VPN miễn phí từ F-Secure

Bước 1: Truy cập vào địa chỉ https://mysafe.f-secure.com/register, điền vào các thông tin đơn giản, bước này không cần phải xác nhận email nên sao cũng được, nhưng mật khẩu phải có 1 chữ hoa, 1 chữ thường và số.


Thứ Sáu, 18 tháng 9, 2015

How to Block countries on Nginx with GeoIP module

How to Block countries on Nginx with GeoIP module

GEOIP : The GeoIP technology allows the web masters to get valuable information about the location of their visitors. It can determine the country, city, area code and much more.The web site developers use it for delivering of customized content based on the geographical location, targeted advertisements, web logs and statistics, spam prevention, location restricted access and other useful solutions.
This tutorial will help you to know how we can use the GeoIP module with nginx to block all visitor from single and multipal countries.

STEPS

  • To Configure Geoip your nginx must be compiled with the HttpGeoipModule. To check if your nginx is compiled with that module, run:

Thứ Tư, 16 tháng 9, 2015

Disable & Remove Get Windows 10 Upgrade Reservation Notification & System Tray Icon

Disable & Remove Get Windows 10 Upgrade Reservation Notification & System Tray Icon
 
If you’re running Windows 7, Windows 8 and Windows 8.1, you may get a surprise notification alert which offers you free Windows 10 upgrade comes in the form of pop-up window, asking you to enter your email address to reserve the free upgrade. In addition, an additional GWX icon named “Get Windows 10” is added to Taskbar’s system tray (notification area). The sneaky Windows 10 update alert is the result of KB3035583 update, a Windows 10 upgrade preparatory package. The update created a new directory in C:\Windows\System32\GWX and installs some executables and files that serve as a notification tool that could display banners and other ads for Windows 10 as the launch date approaches. Meanwhile, the GWXUXWorker.exe file acts as the Windows 10 downloader.
The Windows 10 update notifier behaves according to the phase and how close to the Windows 10 launch is. Digging through the config.xml file reveals the phases that Windows 10 launch could be in, such as None, AnticipationUX, Reservation, Reserved, RTM, GA, UpgradeDetected, UpgradeDownloadInProgress, UpgradeDownloaded, UpgradeReadyToInstall, UpgradeReadySetupInProgress, UpgradeSetupCompatBlock, UpgradeSetupRolledBack, UpgradeSetupFailed, UpgradeSetupComplete and etc.
It’s possible to disable and remove the “Get Windows 10” icon and notification window, by uninstalling KB3035583 update, which was delivered as recommended update to Windows 8.1 Pro, Windows 8.1, and Windows 7 Ultimate, Windows 7 Professional, Windows 7 Home Premium, Windows 7 Home Basic and Windows 7 Starter installed with Service Pack 1 (SP1) early April 2015.
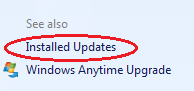
  1. Open Windows Update by going to Control Panel -> System and Security -> Windows Update, or search for it.
  2. Click on Installed Updates on the bottom left corner. Installed Updates
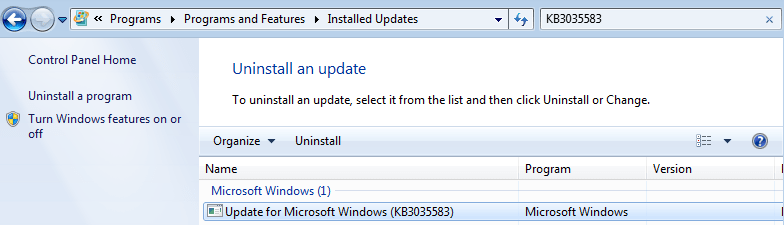
  3. Locate and select the Update for Microsoft Windows (KB3035583) update under Microsoft Windows section. You can search for KB3035583in the search box on top left corner. Uninstall KB3035583 Windows 10 Update Notification Tool
    Note
    Uninstall Update for Microsoft Windows (KB2976978) also if the Get Windows 10 app is not removed completely.
  4. Click on Uninstall to remove the update.
  5. Click Yes to confirm.
  6. When uninstallation process is completed, restart the computer.
You’re now free from Get Windows 10 system tray icon and Windows 10 free upgrade offer reservation nag screen. Some people may still have remnants of the KB3035583 update’s files in %WinDir%\System32\GWX folder. In that case just delete the folder (you may need to take ownership of the folder before able to delete it manually).
Alternative
An alternative to the above steps, open a Command Prompt as Administrator, and run the following commmand:
WUSA /Uninstall /KB:3035583
Or, download a third party utility called “I Don’t Want Windows 10” from GitHub
If you just want to disable the GWX (Get Windows X) app, and keep the update installed, use the Registry Editor (Regedit) to create the following registry key and value. Or, copy and paste the following code into a text file with .reg extension, and then execute it.
[HKEY_LOCAL_MACHINE\SOFTWARE\Policies\Microsoft\Windows\Gwx]
"DisableGwx"=dword:00000001
In addition to the registry key above, you can also rename the GWXUXWorker.exe and GWX.exe files that are responsible for the nag message (as if they’re deleted). To do so, end and terminate the GWX.exe process using Task Manager. Then, rename the GWXUXWorker.exe and GWX.exe which are located at C:\Windows\System32\GWX folder to another name, such as by appending an suffix likes backup or old. If you prefer, you can delete and remove the entire GWX folder too. Note that you may need to give the system permission’s to respective files if you’re facing with access denied issue.
Note
Officially, Microsoft is recommending the following method to turn off notification from “Get Windows 10” app:
Click “Customize” in the System Tray and turn off the Get Windows 10 app notifications in the menu that comes up.

Thứ Bảy, 15 tháng 8, 2015

How to Run Multiple Instances of Google Drive on Windows to Sync Multiple Accounts

orking on multiple Google Drive accounts on the browser is very simple. Once can simply use the Google account switcher and work on multiple accounts in parallel. Unfortunately, when using the Windows application for the same, there is no such feature

IMPORTANT UPDATE: This is an old post and many people recently started reporting in the comments that this method no longer works because the Google Drive app was updated to exclude this feature. Hence we’ve written another post that uses a different method. Here it is -> How to Use and Sync More Than One Google Drive Account on Windows.
multiple Google drive
According to Google Support, once must use application preferences and sign out from the first Google account before using another. But that’s not a solution if you want to sync more than one account and use them in parallel.
Fret not, like always, we’ve got your back. Here’s a method to get it done and run multiple Google Drive instances on the same machine.

Multiple Google Drive Instances

Step 1: Close all instances of Google Drive running on your computer and then download and install this application. After the application is installed, add C:\Program Files (x86)\Google\Drive to your Windows Environment Variable. You can refer to this article to see how it’s done.
Step 2: Having done that, open Notepad and copy paste the following line. Don’t forget to replace username@ domain.com with your Google username.
@ECHO OFF
SET USERNAME=username@ domain.com
SET USERPROFILE=%~dp0%USERNAME%
MD “%USERPROFILE%\AppData\Roaming”>nul
MD “%USERPROFILE%\AppData\Local\Application Data”>nul
MD “%USERPROFILE%\Application Data”>nul
MD “%USERPROFILE%\Local Settings\Application Data”>nul
MD “%USERPROFILE%\My Documents”>nul
MD “%USERPROFILE%\Documents”>nul
START googledrivesync
batch file
Save the file as Account 1.bat to your desktop or another folder where you would like to sync the files. Don’t forget to select All Files as type in Notepad while saving the batch file.
Step 3: Now run the batch file and wait for another instance of Google Drive to Start. The second instance of the application will ask you to sign in to a new account. Proceed normally, just remember to change the sync folder to the new folder that’s created using the batch files in the advanced option.
sign in
advanced settings
Note: Sometimes you might encounter some difficulty while changing the folder. In such a case, copy the exact path of the folder to select the directory.
browse for folders
That’s all, you will now see two instances of Google Drive syncing side by side. Amazing, right? The next time you want to sync files on the secondary account, run the batch file of that particular account. To add every subsequent account, just make a new batch file, run it and configure the application.

Conclusion

As we are not using any third-party application for the trick, this is the best method to sync multiple Google Drive accounts in Windows according to me. However, I think this is one of the very basic feature that should be provided as a built-in feature by Google. What do you think?

GT Explains: What is Environment System Variable and How to Edit it in Windows

Whenever I write content related to Android rooting and ADB access, I often ask readers to add a specific path to Windows System Environment variable so that they can execute the command globally. However, most of the users seem to be having trouble understanding what setting up the environment variable path actually means and the way to edit it in Windows to include the path.
Today I am going to show you how you can edit Environment Variable in Windows but before we see that, let’s understand what it really means.

What Environment Variable Means

Environment Variable is only significant if you are working on Windows Command prompt. Let me state an example for better understanding. Suppose you type in the command ipconfig to find out the IP configuration of your computer. No matter in which folder you are in the Command Prompt, Windows will recognize the command and automatically run it. However, if you try to execute any executable file in a folder without actually navigating to the folder, Windows will not be able to recognize the command.
adb not recognised
It’s not that Windows has a soft corner for the ipconfig command, but the path where the ipconfig command is located in the system, i.e. system32 is configured in Windows Environment Variable by default. So the point is, if you want to run any file on Command Prompt, no matter which folder you are in you will have to set up the Environment Variable Path for it.
So let us now see how we can set up an Environment Variable in Windows to include the path of a folder.

Setting Windows Environment Folder

Step 1: Open Windows Explorer and navigate to Computer. Here, click on the System properties button to open your computer System properties.
system properties
Ads by Google
Step 2: After the Windows System Properties open up, click on the link Advanced System Settings on the left sidebar.
adv sys settings
Step 3: In Advanced System Properties click on the button Environment Variable to open Environment Variable.
edit environment variable
Step 4: Under user variable, double click on PATH to open it. You can now add the path of the folder in the text box. Use a semicolon (;) to merge two or more paths.
environment variable
Finally press the OK Button to save the settings and close all the windows. You can now access the executable files from the configured path globally on Command Prompt.
adb command now recognised

Conclusion

That was how you can edit and include a custom path to Windows Environment Variable in Windows to execute a file throughout the Command Prompt. I have tried my best to put it in as easy way as possible, still if you have questions you would like me to clear, all you need to do is drop a comment